Showing posts with label Cookies. Show all posts

Monday, March 28, 2022

When Life Gives You Lemons, Make.... LEMON BARS


                          This is the year we finally got lemons on our lemon tree- lots of lemons


Small new lemon tree at top right


     Dean planted it in front of our house 5 years ago to replace a gnarled old tree that he despised.


For 3 years we had no lemons. Then last year one lone lemon appeared and was promptly stolen 


This year I can pick lemons to my hearts content and finally make the lemon bars I have been craving with my own lemons. My lemons are Eurekas, which I prefer to the sweeter Meyer lemons (a cross between a lemon and a mandarin orange). I adore the puckery, citrus taste and  bright yellow hue of a Eureka. Above, two freshly picked lemons rest on a ceramic plate - a precious souvenir from a trip to Puglia


The lemon bar suggestion actually came from my brother Tom when we were talking bars right before Thanksgiving. This was long before we had any blossoms on our lemon tree. My brother lives not far from NYC in the small town of Allendale, NJ and we communicate sporadically by phone. His wife's daughter Chryssa had just baked a pan of pumpkin blondies with chocolate and pecans for him and he was raving about them. The recipe was featured in the New York Times Food Section and he insisted that I make them for Thanksgiving. He added that I should then try Lanis's lemon bars. I didn't get around to making the blondies for awhile, but when I did I was impressed. They are unbelievably scrumptious!


Pumpkin blondies with chocolate and pecans are a fall favorite


Lanis, my brother's wife, was a prolific gardener, a talented painter and an outstanding baker. She excelled at whatever she did. Tragically, she was felled by a fatal stroke while speaking at her Bergen County garden club a year and a half ago. She was a healthy, active 76 year old, so her sudden death was a shock to everyone. 


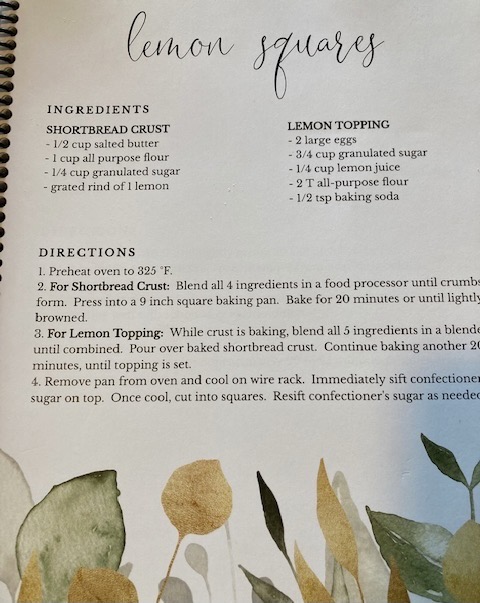
In the aftermath of her death, Lanis's daughters Chryssa and Mary put together an ingenious booklet of their mother's recipes. They included facsimiles of the spattered, yellowing recipe cards with Lanis's  notes and had it bound into a delightful package which they distributed to family and friends. I was lucky enough to receive a copy. Here is the touching preface to the book:

"Mom had many talents, one of which was her incredible knack for baking mouthwatering desserts, cakes, cookies and breakfast treats. Many of our memories center around these baked goods and will forever bring a  smile to our faces. We hope that you enjoy this compilation of favorite recipes which have been well loved and written all over by Mom... Love Chryssa and Mary"


A page with an an old recipe card handwritten by Lanis


The recipe in Lanis's  book seemed like a good place to try my hand at lemon bars. Unexpectedly, I had trouble right from the start. The crust ingredients didn't come together in the food processor so the mixture was too floury and not crumbly enough. It still wouldn't amalgamate  properly when I pressed it into the pan, plus the 9" pan was too big for the small amount of shortbread crumbs, creating a crust that was too fragile.  I proceeded nonetheless and baked it at 325 as noted. After 20 minutes the layer wasn't browned so I turned up the oven and baked it 10 minutes more. Meanwhile I made the excellent lemon topping, but when I poured it over the hot pastry, the result was a filling that wasn't substantial enough for my taste. An 8" pan would have done the trick. Unfortunately, on the whole, I was disappointed with the recipe.

So began my deep dive into the land of lemon bars. Searching for the perfect bar, I found as many variations as bakers who make them. The lemon topping variables consist of the amount of lemon juice to sugar, the number of eggs, the size of the pan and the (small) amount of flour or even cornstarch added. I discovered that the more recent the recipe, the more tart the filling.

The press-in crust, which makes up an important half of the bar, seems to always consist of flour, butter and sugar but differs in the method of mixing the ingredients. Lanis et al. cut cold butter into flour with a food processor, Ina Garten used a mixer, and David Lebovitz melted butter and mixed it in by hand. The pan could be metal or ceramic and varied in dimensions from 9 x 9  to  8 x 8 to 9 x 13. Oh, and I almost forgot to mention that the baking temperature varies from 300 to 350 degrees.
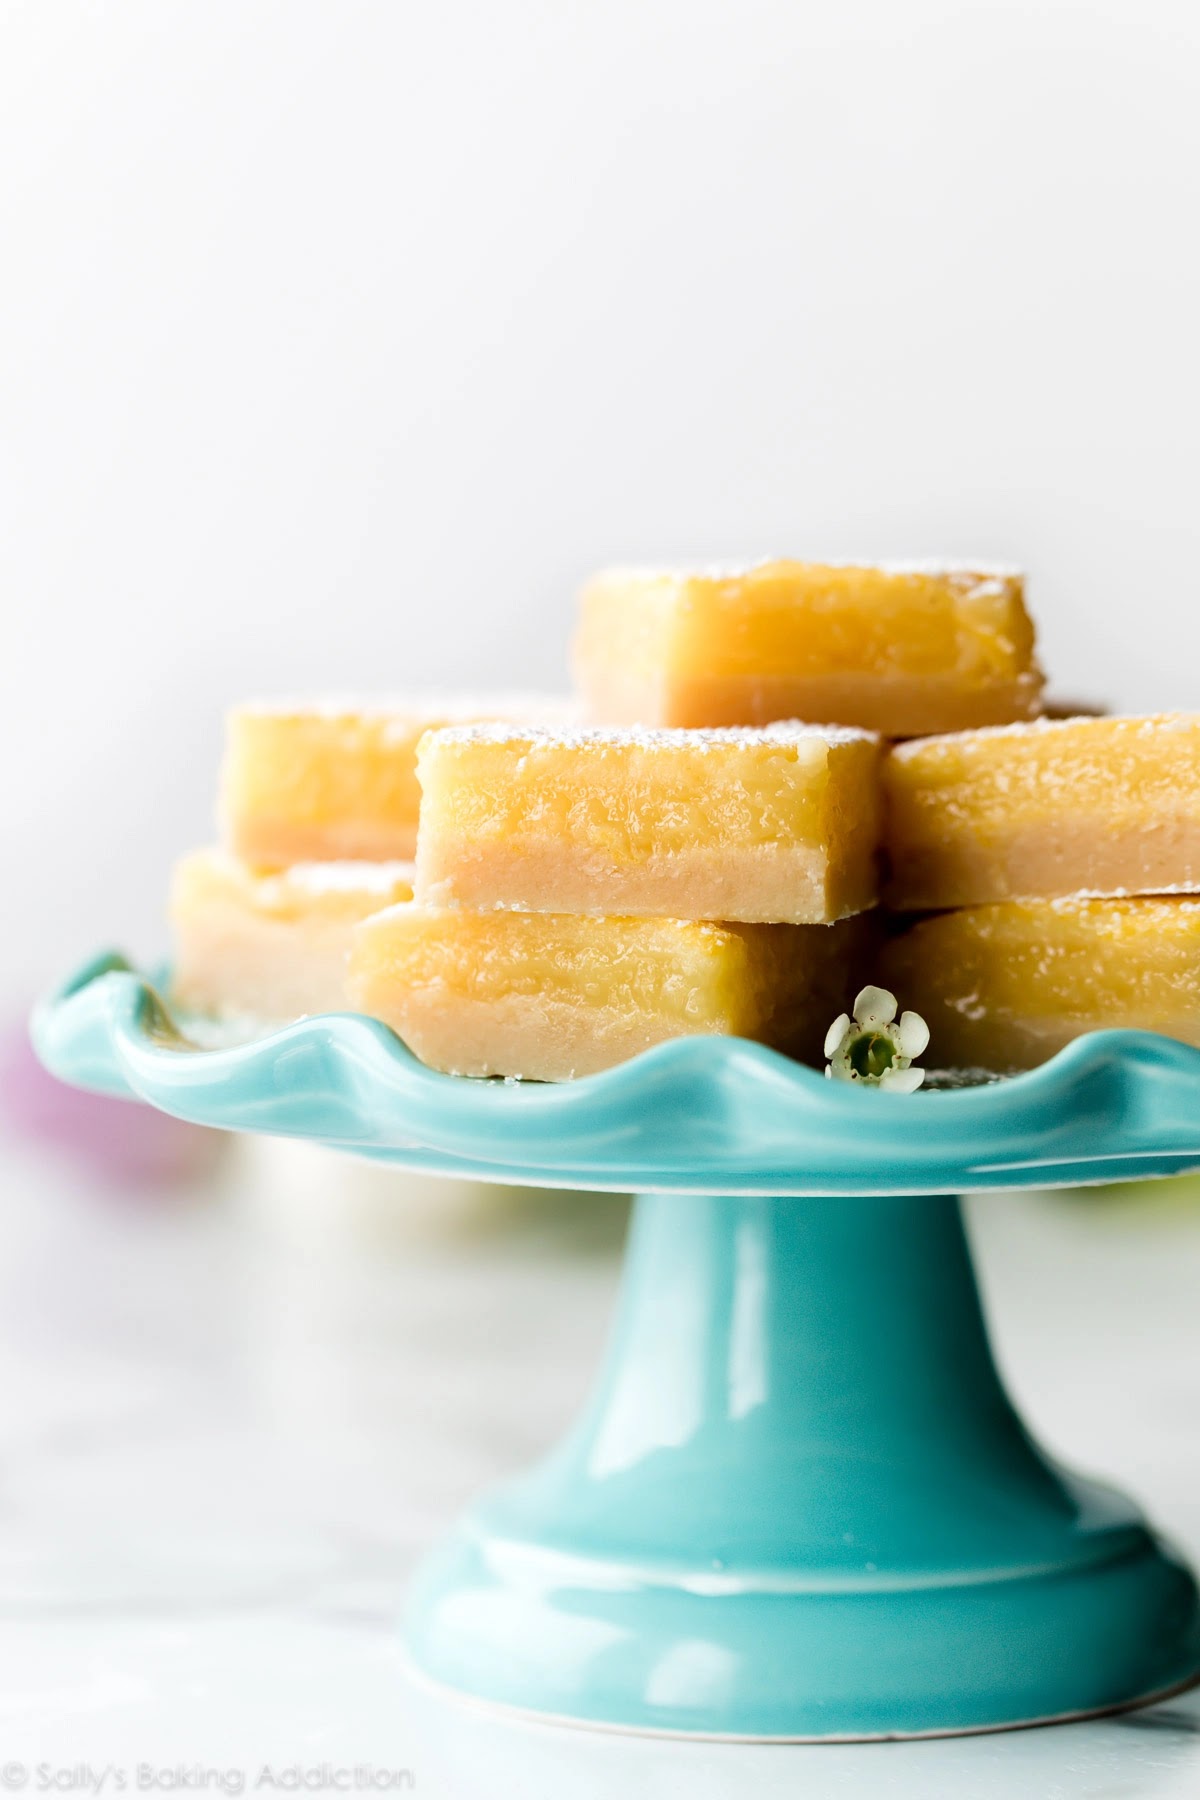


                    Lemon bars with an under baked shortbread crust from Sally's Baking Addiction blog


                                                                s                                                                     
                                    Ina Garten's typically delicious Lemon Bars on the Food Network


                         An example of squares with a pale, thin crust, from The Preppy Kitchen Blog


           Finally I struck gold with a recipe by David Lebovitz, using a whole lemon ground in a food processor


David's bars sport a rich dark buttery crust, made by blending flour with melted butter, which is easily pressed into an 8 " pan, and baked at 350. His are the best lemon bars yet, avoiding both flabby, pale crusts and the thin, anemic filling that I dislike in other recipes. The whole ground lemon gives the filling a powerful zing. Here is his ingredient list, meant to be baked in an 8" pan. For full directions check out his blog post here: David's Whole Lemon Bars

Crust

  • 1 cup (140g) flour
  • 1/4 cup (50g) sugar
  • 1/4 teaspoon salt
  • 8 tablespoons (115g) melted unsalted butter
  • 1/2 teaspoon vanilla extract

Lemon Topping

  • 1 lemon, organic or unsprayed
  • 1 cup (200g) sugar
  • 3 tablespoons (45ml) freshly squeezed lemon juice
  • 3 large eggs, room temperature
  • 4 teaspoons corn starch
  • 1/4 teaspoon salt
  • 3 tablespoons (45g) melted unsalted butter
  • Optional: powdered sugar, for serving
               

My rendition of whole lemon bars ready to be taken out of the oven


But whether they're thick or thin, tart or sweet, I echo what Pat Prager, the prize winning baker, said in J. Ryan Stradal's delightful novel Kitchens of the Great Midwest: "Who Doesn't like bars?"


Thursday, February 10, 2022

Kenan Cookies or (Super Scrumptious Oatmeal Gems)

White out conditions in Connecticut during winter storm Kenan

The weekend of January 29th I was fixated on the blizzard that was battering the East Coast, concerned that my sister was safe in her country house in rural Colebrook CT, where she spends weekends. Through texts she reported that she had been out shoveling twice already and making only slight headway; she told me that the roads aren't plowed until the storm has cleared. To keep warm and busy she decided to make oatmeal cookies, but couldn't find the excellent recipe I had sent her months ago. This required more messages back and forth.


Clear skies and plowed streets in Colebrook, Connecticut      

By Monday, when the skies were blue and the roads were plowed, she volunteered to write a guest post about her experience during the winter storm named Kenan.  Here's another of Lucia's guest posts from the East Coast:


                                                             〰〰〰〰〰〰〰〰〰〰

"When the wind is whipping around and the temperature is frigid, there is nothing nicer than a warm kitchen. Turning on the oven makes my kitchen toasty, but in order to justify it, baking is requisite! That was the story of last Saturday with Winter Storm Kenan in full force on the east coast.


I baked what Taya and I have renamed Super Scrumptious Oatmeal Gems, from a note scribbled on the original and highly annotated, handwritten recipe card. We both love authentic recipes handed down with love."


Here's the original handwritten card. The recipe is printed at end of post


"In my Kenan version, the cookies became a kind of compost confection: I added chopped dates that were languishing in the back of the pantry; they were a little dry, so I soaked them in the last of the Christmas brandy, chopped and added them. The recipe calls for coconut, but I'm not a fan, so chopped nuts, dates, and the end of a box of raisins substituted.

The warm oven belongs to my vintage Chambers stove, Model C, circa 1948  (pictured below). Designed and built for a much more cost-conscious time, its heavy frame holds Rockwool insulation and retains heat after it is turned off. One of its claims to fame was that it continued to cook food even after the gas was extinguished. The extra-heavy iron oven floor ensures even distribution of radiant heat. Baked goods turn out superb!"


Chambers Stove  c. 1948 in my Connecticut kitchen

          Here's the recipe for super scrumptious Oatmeal Gems


  • 1 cup unsalted butter, softened
  • 3/4 cup (125 grams) light brown sugar, packed
  • 1 cup sugar (scant)
  • 2 large eggs
  • 2 teaspoons vanilla extract
  • 2 cups all-purpose flour
  • 1 teaspoon baking soda
  • 1 teaspoon baking powder
  • 1/2 teaspoon salt
  • 2 cups old-fashioned rolled oats
  • 3/4 cup raisins 
  • 1/2 cup coconut (optional)
  • 1 cup walnuts, chopped ( or more to taste)

Set oven to 350 degrees

In a large bowl, cream together the butter, brown and white sugars, eggs and vanilla until smooth. In a separate bowl, whisk the flour, bakings soda, baking powder and salt. Stir the dry ingredients into the butter/sugar mixture. Stir in the oats, walnuts and coconut, if using.

Drop by large teaspoons onto a nonstick baking sheet and bake 10 to 15 minutes. Do not brown too much. Place on racks and store when cool.

Here's a tin of freshly baked oatmeal gems


Thursday, December 2, 2021

Thanksgiving Pies with a Few Family Variations

Pear Tarte Tatin is my sister Lucia's specialty. She wrote: "I'm not a pie maker at all, but every Thanksgiving, I manage to pull off a Tarte Tatin-- not the traditional apple tarte, but a variant suggested in a Molly O'Neill recipe originally published in the New York Times in 1993."  Always a picky eater, Lucia doesn't like the traditional pumpkin or pecan pies, so when she found this French upside down pear tart, she made it her annual contribution to Thanksgiving dinner.

Lucia's 2021 Pear Tarte Tatin


Writing from New York, she goes on to offer a few notes on her Thanksgiving dessert: "I use Bartlett pears---a pedestrian choice, I know. But they are available out of season here. Anjou pears are too juicy and they give off too much liquid as they carmelize. My pears are always quite hard, even with the less juicy Bartletts; I still allow the pears and juice to cook down about twice as long as the recipe says."

"I have an old teflon pan which I use because it is the right size, and also the tarte slides out easily on the flip."

"A last note---don't fear the flip. It's a scary moment, but when the pan is removed, the result will be delicious even  if you have to wipe the sticky juice off the sides of the plate."


  Molly O'Neill's recipe for Pear Tarte Tatin on the New York Times Website

  1. Preheat oven to 375 degrees. Position rack in bottom third of oven. Peel the pears, cut them in half lengthwise and core them. Place in a large bowl and toss with the lemon juice. Set aside.
  2. Place the sugar in a 10-inch skillet or tarte Tatin pan over low heat. When some of the sugar begins to melt, begin stirring with a wooden spoon until all of the sugar is melted and begins to turn a pale golden color.
  3. Remove the pan from the heat. Arrange the pear halves in the pan spoke fashion, cut side up, with the narrow end of the pears toward the center, as close together as possible. Fill in the center with the remaining pears.
  4. Cut the butter into small pieces and scatter over the pears. Place the pan over medium heat. Cook until the sugar turns a deep caramel color and the juices released from the pears are nearly evaporated, about 15 to 20 minutes.
  5. Roll the dough and cover the pears according to the directions in the pastry recipe. Bake until the crust is golden brown, about 25 to 30 minutes. Remove from oven and set aside for 10 minutes.
  6. Run a small, sharp knife around the edge of the tarte to loosen. Place a large plate or platter over the skillet. Holding the plate and skillet together using 2 kitchen towels, carefully but quickly invert the tarte onto the plate. Let stand a few minutes to cool slightly. Cut into wedges and serve with or creme fraiche if desired.
Lucia swears by Ms. O'Neill's pie crust recipe, which contains an egg yolk, so here is the link:  https://cooking.nytimes.com/recipes/10504-tarte-tatin-pastry 


                         Now on to my holiday favorite--- Pumpkin Pie


    Taya's 2020 Pumpkin Pie 


I can't remember when I first started baking this pie, but I know it was well before I mastered the art of pie crusts. Our mother never made pies so we didn't learn that skill at her apron strings. I struggled for years until Pauline, a friend from Sur La Table, taught me to mix the dough in the food processor, chill it and roll it out giving it a turn every so often to prevent sticking. That works every time. Unlike Lucia's crust, I don't add an egg yolk.

My pie recipe appears in Cooking With Herbs and Spices by Craig Claiborne, legendary food editor of the New York Times from 1957 to '86. My copy is spattered and worn with use, but sports the original dust jacket. I drag it out every November and adjust amounts every so often, penciling notes in the margin. I prefer more spices, less molasses and less evaporated milk than the original. After much experimentation, I can say that I prefer Libby's canned pumpkin which, as it turns out, is actually squash.


Here is the page with my faithful pumpkin pie recipe from Cooking with Herbs and Spices


A New Addition to the holiday pie roster---Apple Pie Cookies

A New addition to the Holiday pie roster


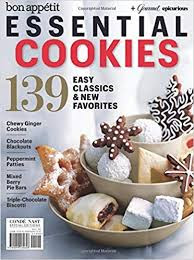
Two years ago I bought a Bon Appétit "special edition" booklet on the news stand, titled Essential Cookies. In it I spotted a recipe for Apple-Pie Cookies. Here's the description that precedes the recipe: "Each flaky cookie crust holds a dollop of cinnamon-flecked apple filling, creating a dessert that celebrates fall." I was sold and started baking!


The cookies were time-consuming, but fun to construct. I have a collection of cute little cookie cutters, so I chose the  mini pumpkin to cut out the hole in the "top crust."  Many recipes in the booklet were favorites from the now defunct Gourmet Magazine. Gourmet's recipes were always meticulously tested and came out perfectly. As expected, the fresh- baked cookies were winners and I knew I had a new holiday tradition.


Copied from my Essential Cookies booklet


Sunday, September 12, 2021

Maida Heatter's Key Largo Oatmeal Cookies--with Potato Chips

My faded 1977 copy of her first book


My expert hairstylist Maria, who is also a talented baker, mentioned  Maida Heatter's Key Largo oatmeal cookies last week. We then launched into a conversation about her recent death at 102 years old, and this kooky recipe with a secret ingredient. I've baked many oatmeal cookies in my life but never one with potato chips. I had to have the recipe. I hoped that it would be in Maida Heatter's Book of Great Cookies, which I own.        


My small collection of her many cookbooks


I went home and checked all of my Maida Heatter cookbooks for the recipe and came up empty. Then I went online and tried to locate Key Largo oatmeal cookies. I found nothing linking Ms Heatter to Key Largo cookies. The only recipe I found for these cookies was from a website called The Family Cookbook Project which listed Nancy Watson as the contributor. No mention of Maida Heatter.  Here's the reference:

Key Largo Oatmeal Cookies Recipe

  Tried it? Rate this Recipe: 


This recipe for Key Largo Oatmeal Cookies, by Nancy Watson, is from The McCormick Family Cookbook, one of the cookbooks created at FamilyCookbookProject.com. We'll help you start your own personal cookbook! It's easy and fun.  Click here to start your own cookbook

-----------------------------------------------------------------------------------------------------------------------------


I started to wonder if the  the Key Largo cookie was actually a Maida Heatter original. I suspected it was, since she lived had lived in Florida her entire baking career, so I kept searching and finally found the  attribution in a website I have come across before called  Eat Your Books. It's a frustrating site because, though it highlights the recipe you're looking for and includes all the publication details, it only gives the ingredients but doesn't include the directions. I personally am not confident enough to waste time and money on a recipe lacking such important information. At least I did confirm that the recipe is included in Maida Heatter's Brand-New Book of Great cookies which is one of many of hers that I don't own.  

Now I had the full recipe from The Cookbook Project and I knew it was included in a Maida Heatter book. All that was left was to buy a bag of potato chips and start baking. I soon made a batch and declared them winners. They are now included in my bulging file of favorite oatmeal cookies. As Maida said "Baking cookies is a great escape. It's fun. It's happiness. It's creative. It's good for your health. It reduces stress"


Key Largo Oatmeal Cookies (reprinted from The Cookbook Project)

4 oz salted potato chips
6 oz (1 1/2 C) walnuts
2 C sifted unbleached flour
1 tsp baking soda
8 oz (2 sticks) unsalted butter
1 tsp vanilla extract
1 3/4 packed C light brown sugar
2 eggs graded large
2 C old-fashioned (not instant) oatmeal
10 oz (2 c) dried pitted sour cherries (raisins or cranberries could be substituted. Or a combination of all or any two. I use only the cherries.)
 
Adjust two racks to divide the oven into thirds and preheat oven to 350º. Line cookie sheets with baking parchment or aluminum foil, shiny side up and set aside.

Place the potato chips in a plastic or paper bag and squeeze the bag a few times with both hands to break the pieces just a bit. They should be coarse, not fine. They should measure 2 packed cups, set aside. Break the walnuts into large pieces. Set aside.

Sift together the flour and baking soda. Set aside.

In the large bowl of an electric mixer, beat the butter until soft.. Add the vanilla and sugar and beat until mixed. Add the eggs and beat to mix. The add the sifted dry ingredients and beat on low speed only until incorporated. Add the oatmeal and beat to mix. Remove the bowl from the mixer.

Transfer the dough to a larger bowl (if you don't have one, you can do this in the same bowl, just not as easily.) With a heavy wooden spatula stir in the cherries and nuts. Finally, stir in the potato chips. The chips should still be visible. This takes a strong arm and some heavy stirring.  

Each cookie should be made of 1/4 C dough. You can use two spoons and guess at the amount, a 1/4 C measuring cup or (this is best), or a small ice cream scoop (the scoop that measures 2 inches in diameter is the right size).

Place a large piece of aluminum foil next to the sink and place the mounds any which way on the foil. Then wet your hands under cold water, shake them off, but do not dry them and with your damp hands roll a mound of dough into a ball, flatten it to about a 3/4 in. thickness and place it on a lined baking sheet. Continue to shape the cookies and place them 2 in. apart (no more than 6 on a 12 by 15 1/2 in. sheet. Keep your hands damp as necessary.

Bake two sheets at a time for 18 to 20 minutes, reversing the sheets top to bottom and front to back twice during baking. (If you leave one sheet on the lower rack for too long, those cookies might become too dark on the bottoms). When done, the cookies should be lightly browned all over. Do not over bake. If you bake one sheet alone, bake it on the higher of the two racks and reverse it front to back once or twice during baking. When you bake one sheet alone, the cookies will bake in less time.

Let them cool briefly, then with a wide metal spatula transfer them to racks to cool.  
These can be stored in an airtight box or they can be wrapped two together (bottoms together) in clear cellophane, wax paper or aluminum foil. (Always store these two together, bottoms together).


Thursday, August 2, 2018

Today We're Making Oatmeal Cookies


Actually, the cookies above are not my cookies. They were baked and photographed by Joy the Baker who has an inspirational blog. She inspired me to make my current favorite Oatmeal School Cookies from the classic cookbook Laurel's Kitchen. As you might notice from previous cookie posts, I love oatmeal cookies both for their wholegrain goodness and sweet chewy appeal.


Laurel's Kitchen, A Handbook for Vegetarian Cookery and Nutrition was written by Carol Flinders, Laurel Robertson and Bronwen Godfrey. Published in 1976, it contributed to the increasing awareness of vegetarian eating in the U.S. The second edition called The New Laurel's Kitchen came out in 1986 and is still in print. Laurels Kitchen was a little too hardcore for my taste. I gravitated toward the Vegetarian Epicure I and II by Anna Thomas. But I still browsed through Laurel's information and recipes and somehow came away with this recipe for oatmeal school cookies to add to my growing repertoire of oatmeal favorites.


My version of Oatmeal School Cookies, stored in a cookie tin

I guess I first baked these cookies in the 70's and I liked the flavor but I found them to be unpleasantly hard. Maybe I over-baked them but, for whatever reason, they never made my list of favorites nor were they included in my files. Then lately the memory of oatmeal school cookies crept into my sensory stream of consciousness. I remembered the crunch of sesame seeds and a wholegrain goodness that appeals to me now. I generally add whole wheat flour to most of my baked goods and I like the results. Of course Laurel's version would be 100% whole wheat and include wheat germ as well, so it was time to locate the recipe. No need to visit the library, the recipe showed up on the Canadian blog Ten More Bites.

The original recipe calls for pumpkin or sunflower seeds, but I remembered sesame seeds, so that is what I used. I require walnuts in my cookies and Dean requests chocolate chips, so both are included. Dean (or Mr. P as Jeanette calls him} loves them!


                                                OATMEAL SCHOOL COOKIES

1/2 cup butter
3/4 cup brown sugar
1 egg
1 tsp vanilla
1 cup wholewheat flour
1 tsp baking powder
1/2 tsp salt
1/2 cup toasted wheat germ
3/4 cup rolled oats
3/4 cup raisins and chocolate chips
2/3 cups toasted sesame seeds
1/2 cup chopped walnuts (optional)

Preheat oven to 375 degrees F.
Using a mixer, cream butter and brown sugar. Add the egg and vanilla and beat to combine.
In a separate bowl, mix the flour, baking powder, salt, wheat germ and oats. Combine with other ingredients.
Stir in raisins and chocolate and seeds. If the mixture seems a bit crumbly, add a tablespoon of water or apple juice.
Drop Tablespoonfuls onto  baking sheets, flatten tops. Bake for 10-12 minutes. Cool on a wire rack

                                                                              §§§

Thursday, May 25, 2017

Chocolate Chip Tahini Cookies à la David Lebovitz


This is the picture that got me. As a sucker for oozing chocolate chip cookies, I lighted up when I  made my occasional scan of David Lebovitz's blog and saw this outrageous photo. Then I noticed the tahini and I headed straight for the kitchen.


The dough came together quickly, but I adjusted the recipe to my personal taste and used half the chocolate chunks (Scharffen Berger bittersweet and semisweet pieces) and I added a cup of walnuts to the mixture. Next time I'll add even more. Also, because I'm not a fan of the salty-sweet trend, I omitted the salt sprinkles at the end. I like a classic sweet cookie, even though David's first word is "salted."

My cookies just out of the oven cooling on the tray
Boy, my cookies did not resemble the plump, oozing specimens in David's photo, but one bite told me that I had a winner. Like he says, these are some of the best chocolate chip cookies I have ever had. They were crisp when they were warm and they remained crisp to the end, three days later. Chocolate lovers like my husband will want more chocolate, but these are perfect for me.

Here is the recipe copied from the David Lebovitz blog:

Salted Chocolate Chip Tahini Cookies
18 to 25 cookies 
Adapted from Modern Israeli Cooking: 100 New Recipes for Traditional Classics by Danielle Oron. I used chopped chocolate, rather than chocolate chips, for these cookies since I wanted large chunks of oozing chocolate rather than little bits of chocolate here and there. (But feel free to use chips if you’d like.) Normally when I chop chocolate for cookies, I add any small bits and pieces on the cutting board along with the bigger chunks. But for these, I wanted distinct, more assertive pieces of chocolate, so I sorted through and just used large chunks, saving the smaller bits for another baking project. I baked these cookies in a larger size, then tried them in smaller portions, and give baking times for each. Whichever size you bake them in, since everyone’s oven is different, it’s important to use visual clues rather than rely on precise minutes and numbers to tell when they’re done. Keep an eye on them during the final minutes of baking; the cookies are done when quite pale in the center and browned around the edges.
8 tablespoons (115g, 4 ounces) unsalted butter, at room temperature
1/2 cup (120ml) tahini, well stirred
1/2 cup (100g) granulated sugar
1/2 cup (90g) packed light brown sugar
1 large egg, at room temperature
1 large egg yolk
1 teaspoon vanilla extract
1 cup plus 2 tablespoons (150g) flour
3/4 teaspoon baking soda
1 teaspoon kosher or sea salt
2 cups (280g) bittersweet or semisweet chocolate chunks, or chocolate chips
flaky sea salt, such as Maldon or fleur de sel
1. In the bowl of a stand mixer, beat the butter, tahini, granulated sugar and brown sugar on medium speed for 2 to 3 minutes, until fluffy. (The dough can also be made in a large mixing bowl, stirred with a spatula.)
2. Stop the mixer and scrape down the sides. Add the egg, the yolk, and vanilla, and continue to mix for another minute, stopping the mixer to scrape down the sides of the bowl during mixing, to make sure the eggs are getting incorporated.
3. In a small bowl, whisk together the flour, baking soda, and kosher or sea salt. With the mixer on low speed, add the dry ingredients until just combined, then add the chocolate chips. Do not overmix. Cover the dough and refrigerate overnight.
4. Preheat the oven to 325ºF (180ºC). Line two baking sheets with parchment paper or silicone baking mats.
5. Form the cookies into rounds using an ice cream scoop, or your hands. For small cookies make each 1 1/2-inch (3,5cm), for larger cookies, make them 2-inches (5cm) round. Place them evenly spaced on the baking sheets, 3-inches (8cm) apart). Bake one sheet at a time, so you can keep an eye on them, in the middle rack of the oven.
6. Bake the cookies, turning the baking sheet in the oven midway during baking, until the cookies are golden brown around the edges but still pale in the center. For small cookies, about 12 minutes, for larger cookies, about 14 to 15 minutes. Remove from the oven, sprinkle cookies with a bit of flaky sea salt, and let the cookies cool on the baking sheet. Bake the remaining cookies the same way.Storage: These cookies will keep for two or three days at room temperature, but are definitely better the same day they’re baked. The unbaked dough can be refrigerated for up to one week, and frozen for up to two months.

My second try

My first cookies evaporated so fast that I had to make another batch. I adjusted this recipe to look more like David's. I made the cookies larger and thicker, I used more chocolate chunks and I salted the tops with sea salt to finish. Even better this time! At least some oozing is evident.
I met David in 1998 while he was teaching a cooking class at Sur La Table in Berkeley, where I worked. He was living in San Francisco then, just before moving to Paris. He arrived early and made a batch of extraordinary brownies for the staff and cooking class volunteers. I was bowled over by the rich, intense fudginess of his creation and the next day I asked Sandy Sachs, the cooking class coordinator, for David's recipe. To my surprise, the copy she handed to me was a Scharffen Berger hand out. The treat he had made were the chocolate brownies developed by Robert Steinberg for Scharffen Berger Chocolate Maker. The staff knew Robert because he poked around Sur La Table while he was developing the recipes for his fledgling chocolate company. David also became friendly with Robert and John Scharffenbeger when they were launching the company. In Robert's 2008 obituary, David wrote: "I was really fortunate to know Robert and  had the pleasure of watching him make chocolate, swooning over a luscious spoonful of the sticky, half-crushed cocoa beans...learning how to be a more perceptive and thoughtful taster..."


So what started out as "classic chocolate brownies" on a faded mail order leaflet, became "Robert's Fudgy Brownies." The recipe below was printed in a small booklet enclosed in Scharffen Berger's
bittersweet baking bar boxes. The company no longer includes these recipes, so I'm glad I kept the leaflets from the bittersweet and semisweet baking bar packages.